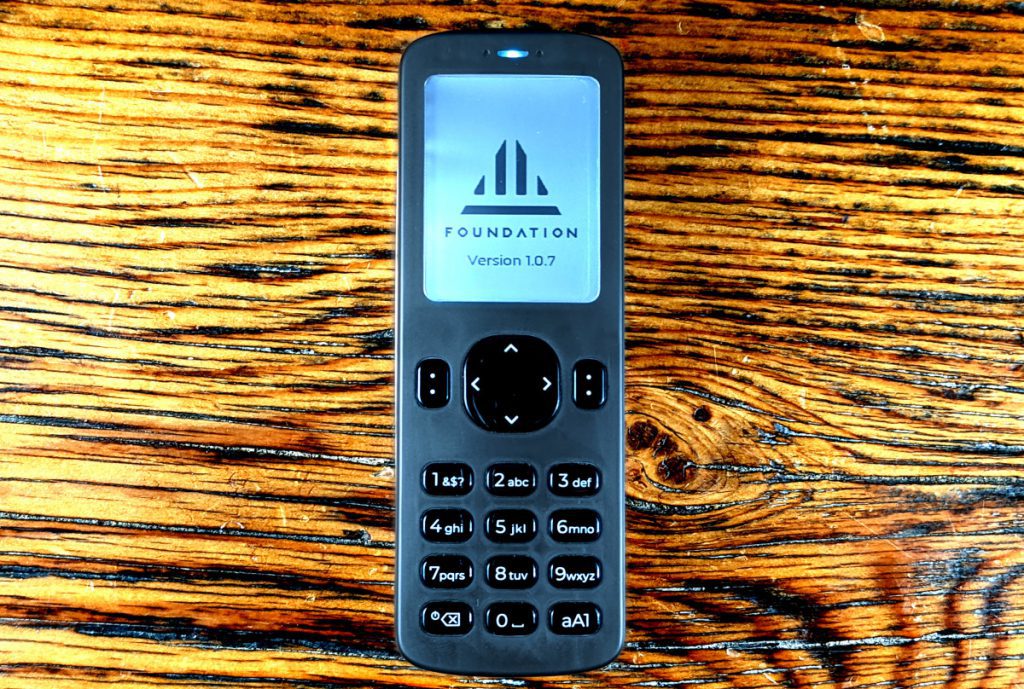
This guide explains how to get started with a Passport cold storage wallet. The passport is a Bitcoin hardware wallet that is assembled in the U.S., fully open source and designed to only be used in a secure, air-gapped fashion.
Taking self custody of your bitcoin means that you are ultimately responsible for your own wealth, there is no bank vault to protect you or a 1-800 help line to reverse a transaction. Being able to transact without permission is powerful, and with great power comes great responsibility. So, let’s get your journey into self custody started on the right foot.
This guide covers:
Unboxing
Generally speaking, it is good practice to use a P.O. Box when ordering Bitcoin-related products or materials. This helps prevent your exposure to risks associated with data breaches. If you have any suspicion that your device was tampered with in transit, contact [email protected].
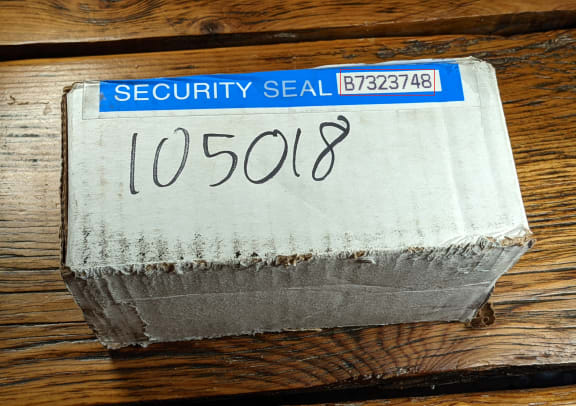
The Passport is shipped in a white cardboard box with a blue, tamper-evident security seal. There is nothing on the outside of the box which indicates it has anything to do with Bitcoin. The number printed on the security seal is not recorded by Foundation Devices, but the initial batch of Passports all shipped with label numbers that start with B722, B732 or B733. If the tamper-evident tape is disturbed, it will reveal the word “VOID.”
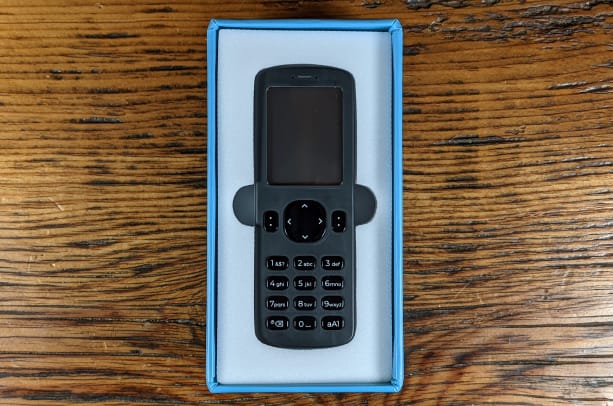
Inside the cardboard box you will find a bubble-wrapped box containing the Passport. This inner box also has a tamper-evident seal on it. You will also find some stickers and a note card with some basic explanations on it about your new Passport. The founders edition includes a miniature copy of the Bitcoin white paper printed in the form of a passport.

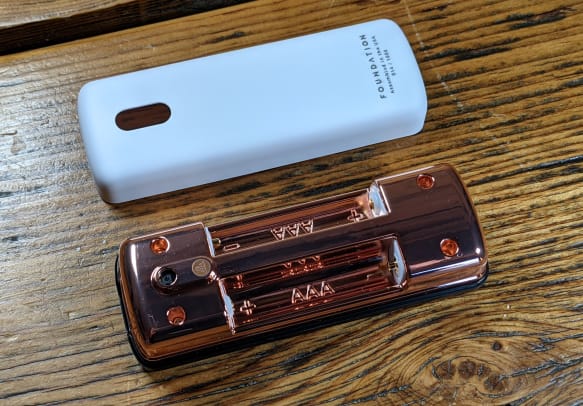
After removing the bubble wrap and cutting the tamper-evident seal, inside the inner box you will find your new Passport. Underneath the Passport you will find two AAA batteries and two, eight-GB microSD cards.
All together, everything necessary to get started is included. The Passport measures 108 mm in length by 38 mm in width.

To get started, simply remove the magnetic cover from the back of the device and insert the included AAA batteries. The back of the included informational card has a QR code that you can scan with your phone to visit the Foundation Devices setup page.
Next, you’ll see how to power on the Passport and verify the supply chain check to ensure the device is genuine.
Supply Chain Validation
This section demonstrates how to power on the Passport and execute the supply chain validation. There is a private key stored on the secure element used for this validation. By scanning a static public key QR code with the Passport, it will generate four words which are used as a checksum that only a valid Passport private key can produce.
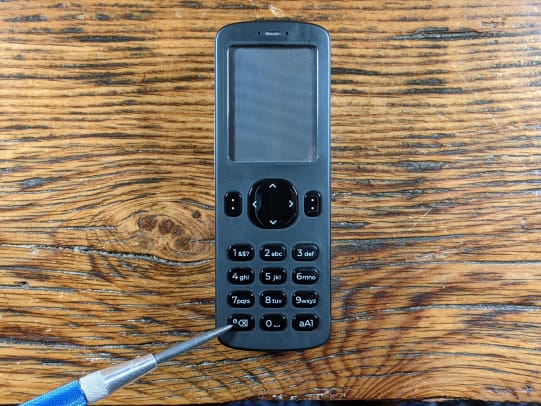
Hold down the button in the lower left-hand corner of the Passport for about half of a second until the device lights up. After the initial boot, you will be greeted with a welcome message. You can scroll to the bottom of that message by holding the “down arrow,” then press the “continue” button.
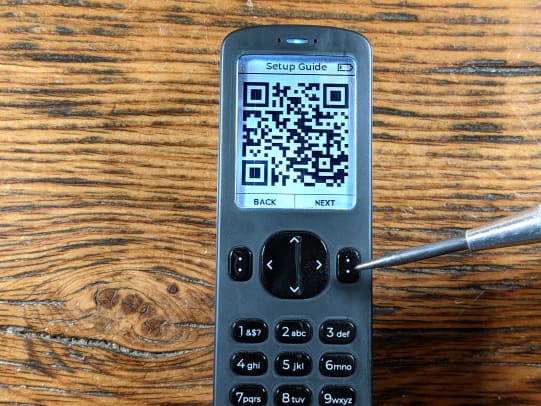
Next, you will see a QR code that you can scan with your phone to visit the setup guide if you haven’t done so already. Then you will need to accept the terms of use by pressing the “continue” button.
Finally, confirm having read the terms by pressing the “continue” button.
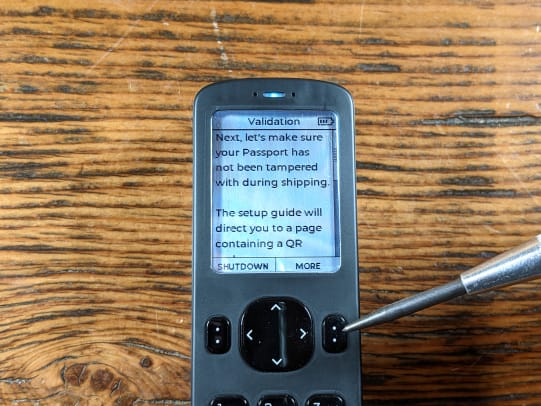
For this next step, ensure your batteries are well charged, then you will want to have the supply chain validation QR code open on your computer or phone. Read and scroll down to the end of the validation message, then press the “continue” button. This will launch the camera and you can then scan the validation QR code on your device’s screen.
The Passport will then display four words on the screen. Enter these words into the interface under the validation QR code. You should receive a validation message confirming that your device is a legit Foundation device.
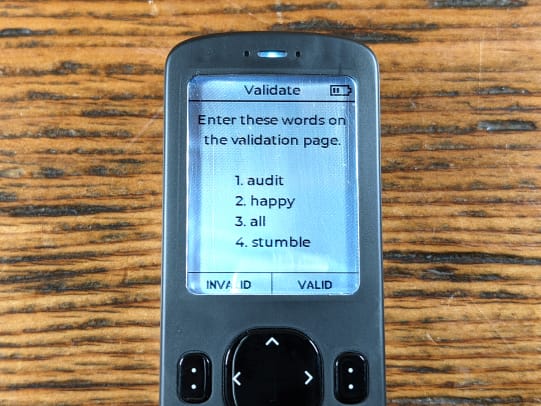
Then press the “VALID” button and you are ready to set up your PIN. At this point, it is a good idea to get a notepad and pen or pencil ready to write down some information that you will need to secure.
PIN Setup
This section demonstrates how to set up the PIN for accessing your Passport. Have a notebook and pen or pencil ready. To start, there are a few considerations to understand and then the steps to complete this process are outlined.
The PIN number is used to secure access to your Passport. Without the PIN number, your Passport will be inaccessible. There is no way to recover a lost or forgotten PIN, so be sure to secure your PIN in such a way that you will not lose access to it. Best practice is to physically write this information down in a notebook that you keep private and secure. Throughout this guide, there are going to be a few pieces of information that will be sensitive in regards to accessing the Passport and the signing keys it will contain. By writing this information down on paper, you can mitigate the risks introduced using digital media.
For example, in a digital file, this information can be remotely accessed on a network connected computer if the computer is compromised. Additionally, other forms of digital media such as images or video can not only be accessed remotely on a compromised device but they could also be copied and transferred quickly and easily by anyone who has physical access to the computer or other device. Although it is true that anyone with physical access to the handwritten information could easily snap a picture of it, at least the notebook could be easily hidden in an inconspicuous place or secured in a safe whereas putting a computer in a safe may not be convenient or practical.
Using a PIN that is easy to guess could result in loss of bitcoin if an adversary gets a hold of your Passport. There is benefit to using a PIN that is difficult to guess. The PIN must be at least six digits in length. You will enter the first four digits and then you will be presented with two anti-phishing words. Write down these anti-phishing words, these are unique words that are generated by using some entropy from the Passport in combination with your PIN’s first four digits.
After establishing your new PIN, upon re-entry to the Passport, you will be presented with these same two anti-phishing words. If you are ever presented with different ant-phishing words then you either entered the first four digits of your PIN incorrectly or your device has been tampered with. If that happens to you, do not proceed with accessing your device until you figure out which situation you are in at that point.
As a security feature, the Passport will brick itself if there are 21 failed PIN attempts. Once a valid PIN is entered, the counter resets to zero.
After the supply chain validation from the last section, you should see a message on your Passport that explains some details about the PIN. Scroll down to the bottom of that message with the “down arrow.” After reading the entire message, press the “continue” button.

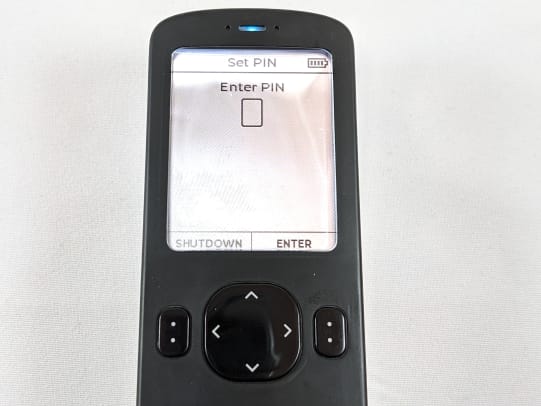
Next, you will be presented with a blank PIN entry dialog. Use the numbered keys on the Passport to enter the first four digits of your new PIN. Immediately upon entry of the fourth digit, you will be presented with the two anti-phishing words. Write down the first four digits of your PIN along with these two anti-phishing words.
Speaking this information out loud could introduce a potential risk of exposing the details to any devices that may be listening to you. Then press the “next” button and enter the remaining part of your PIN and write that down, too. This remaining part needs to be at least two digits long and can be as much as eight digits in length. Your PIN in its entirety can be up to 12 digits in length. In this example, the PIN “12345678” is used. Do not use “12345678” for your PIN.
When finished press “enter.” You will then be asked to confirm your PIN by first re-entering the first four digits, confirming the two anti-phishing words, and re-entering the remaining part of the PIN.

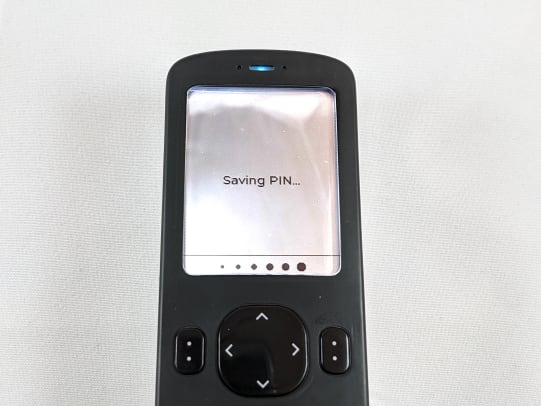
Again, press “enter” when finished and the Passport will save this information. From now on the PIN will be required to access your Passport. A lost or forgotten PIN cannot be retrieved from the Passport. No one can assist you with recovering a lost or forgotten PIN. The Passport will brick itself after 21 failed PIN entries. Be sure to write down and secure your entire PIN and the two anti-phishing words. Once the Passport is finished saving the PIN details, you will be at the main menu.
Before setting up your new cold storage wallet, it is a good idea to ensure the firmware is up to date.
Firmware Update
For this section, you will need a USB adaptor for your included microSD card, unless your computer has a microSD card port. Keeping the firmware on the Passport up to date is important as this is how new features are introduced, quality of life improvements are made, security issues are resolved and bugs are fixed. Foundation regularly releases firmware updates, so be sure to stay up to date with these as they occur. Navigate to the official Foundation firmware page to see more details.
In this section, updating the firmware will be demonstrated in two ways. The first way involves fewer steps but forgoes independent verification, the second way demonstrates using the developer’s PGP public keys and signatures to cryptographically verify the integrity of the firmware file.
The Passport will only allow firmware to be installed if it has been signed by at least two out of four possible Foundation developer PGP keys. This gives beginner or intermediate users the ability to update their firmware with a reasonable degree of confidence, while giving advanced users the ability to verify the integrity of the firmware themselves.
Before getting started with either approach outlined below, first check your Passport to compare the currently installed firmware version with the currently available firmware version.
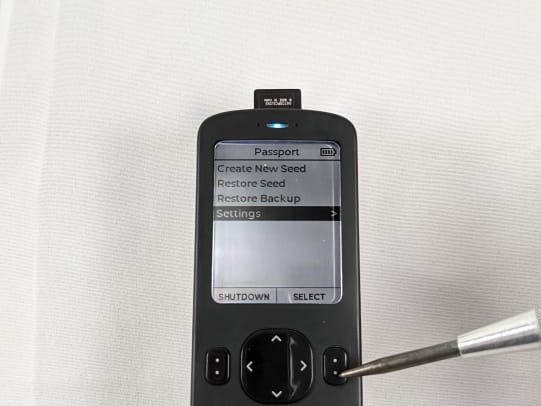
Log into your Passport by powering it on, typing in the first four digits of your PIN, confirming your two anti-phishing words, and entering the remainder of your PIN. From the main menu, navigate to “Settings,” “Firmware,” “Current Version.”
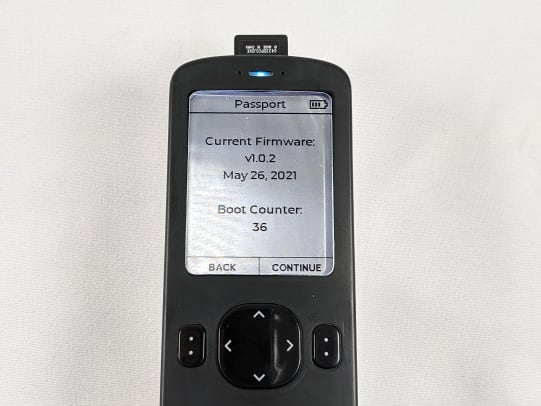
There you will see the currently installed firmware version, the date of its release and a boot counter. The boot counter tells you how many times the Passport has been powered on. Compare the currently-installed firmware version to the displayed currently-available version on the Foundation firmware download page. If the installed version is lower than the available version, then you will want to update that. If you have the latest firmware installed, then you can skip to the next section. Press the “back”: button to return to the previous sub menu.
Simple Firmware Update
Navigate to the Foundation setup page and click on the link to open the firmware download.

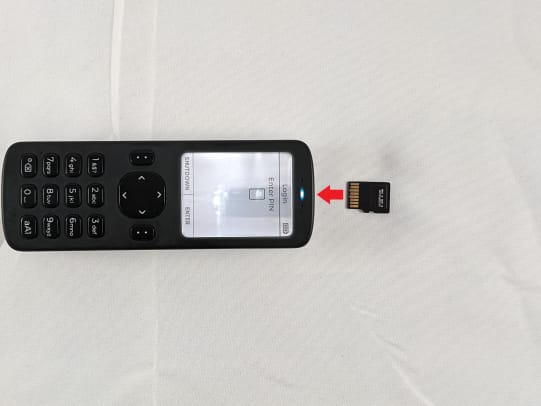
Clicking on that link will automatically initiate the Foundation firmware “.bin” file download to your computer. If your computer is equipped with a microSD slot, then you can simply insert the microSD card. If your computer does not have a microSD slot, then you may need to use your own USB-to-microSD adaptor, insert your included microSD card into the USB adaptor and then insert that adaptor into a USB port on your computer. Once the computer recognizes your USB adaptor, then simply open a file explorer and copy/paste the firmware “.bin” file to the microSD card. Then safely eject the microSD card.

The microSD card inserts to the port on the top of the Passport. The microSD card does not fully insert to the device, it will be sticking out about half way. Ensure the pins on the microSD card are facing up, the same direction as the face of the device.
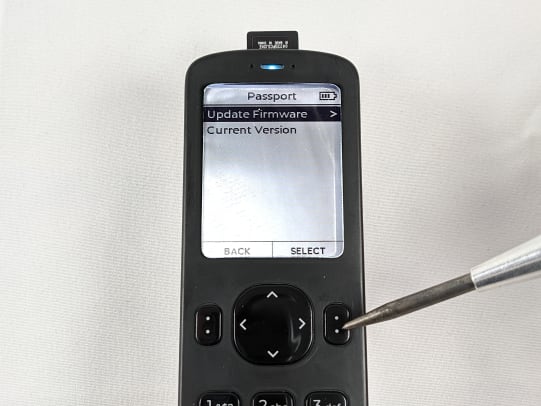
From the same sub-menu where you checked the firmware version, select “Update Firmware” this time. Then follow the prompt and press “continue.” On the next screen, scroll to the bottom of the message by pressing the “down arrow.”
Confirm you want to proceed by pressing “YES.”
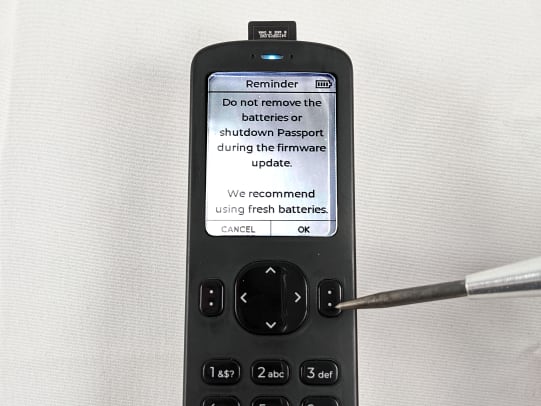
On the next screen you will see a message warning you not to power off the Passport during the firmware update. Having fresh batteries installed is recommended. Press “OK” to continue. Then the Passport will first prepare the update and then execute the update. After a moment, the Passport will display the new currently-installed firmware version.
After the firmware update is finished you can remove the microSD card and continue to set up your seed phrase. Or, if you want to see how to cryptographically verify the integrity of the firmware file before you install it on your Passport, then continue with the advanced update details below.
Advanced Firmware Update
Learning how to verify software is an important but often overlooked step that can save you from a number of threats. The risk is that malicious software could be uploaded to compromised servers that you then download thinking it is legitimate. Or malicious websites that aim to imitate the legitimate website could fool you into thinking you are getting the software from the real company directly.
The basic idea behind software verification is that you can use cryptographic signatures and hash values to prove that the software you downloaded is in fact exactly what the developers intended on you receiving. This is different than a security audit, in which experts parse through the code line by line to verify that it is not doing anything malicious. The verification part only assures that the downloaded software is what it purports to be, whether or not the developers who created that software are up to nefarious schemes is another issue but one that is mitigated through open-source software that anyone can look into and put many eyes on.
There are a couple of things that you will need in order to verify your Passport firmware:
The steps outlined below will be demonstrated with the Windows Gpg4win key manager tool. If you are using Linux, the instructions can be found on the official Foundation page here.
You will need to have your own PGP key pair setup in Kleopatra (the key manager tool in Gpg4win) in order to certify the Foundation public key. You can learn more about setting up Kleopatra in a variety of video tutorials such as this one. The following steps assume you have already configured your own PGP key pair.
Also, for Windows users, there is a handy freeware hex editor called HxD that makes calculating hash values easy.
Once you have Gpg4win installed, your own PGP key configured, and HxD installed, navigate to the Foundation GitHub repository and download the latest firmware file, signature file and make note of the firmware file hash value. Save the two files in a convenient folder and keep a tab open to easily refer back to the hash value in a few steps.

Next, navigate to the Foundation firmware update support page and download the developer’s public key. You can save this in the same folder as the other files if you would like.

Next, you want to import the Foundation public key to your Kleopatra keychain manager. Click on the “Import…” icon in the top menu.

Then navigate to the folder where you saved the Foundation public key, select this file and click on “Open.”

Then click on “Yes” to certify.

Now compare the displayed finger print in the Kleopatra dialog to a publicly-displayed fingerprint for the Foundation developer. In this case, from the Foundation website. If they match, then click on “Certify” to enter your password and complete the import/certification.

Now, when you try to validate a signature file signed by the Foundation key it will give you the green dialog box, instead of the white-colored dialog box which means that the signature is valid but not certified. It is important to be able to distinguish between a certified and valid signature (green), a valid but not certified signature (white), and an invalid signature (red).

Navigate to the folder where you saved the firmware “.bin” file and the developer’s “.sig” signature file. Right click on the “.bin” file then select “More GpgEX options,” and “Verify.” Then you should get the green certified and verified dialog box.

This means that so far you have confirmed that the “.bin” firmware file you downloaded is verified with the Foundation developer signature.
Next, open the “.bin” firmware file with HxD and then navigate to “Analysis” and “Checksums” and choose “SHA256.” HxD will then compute the SHA-256 hash value and you can compare that to the one displayed on the Foundation GitHub site.

Now you are ready to load the verified firmware file on your microSD card and import it to your Passport. Using your own USB to microSD adaptor, insert your included microSD card into the USB adaptor and then insert that adaptor into a USB port on your computer. Or if your computer has a microSD card port, then you can just use that. Once the computer recognizes your USB adapter or the microSd card then simply open a file explorer and copy/paste the firmware “.bin” file to the microSD card. Then safely eject the microSD card.
The microSD card inserts to the port on the top of the Passport. The microSD card does not fully insert to the device, it will be sticking out about half way. Ensure the pins on the microSD card are facing up, the same direction as the face of the device.
From the same sub-menu where you checked the firmware version, select “Update Firmware” this time. Then follow the prompt and press “continue.” On the next screen scroll to the bottom of the message by pressing the “down arrow.” Confirm you want to proceed by pressing “yes.”
On the next screen you will see a message warning you not to power off the Passport during the firmware update. Having fresh batteries installed is recommended. Press “OK” to continue. Then the passport will first prepare the update and then execute the update. After a moment the Passport will display the new currently installed firmware version.
After the firmware update is finished you can remove the microSD card and continue to set up your seed phrase.
Creating A Seed Phrase
This section covers how to create a seed phrase on the Passport. The Passport is going to generate 24 English words, these words make up the seed phrase. A seed phrase is simply a human-readable representation of the signing key for your bitcoin. The seed is sensitive and should be regarded in the same way cash, gold or jewelry is regarded. If anyone gains access to your seed phrase, then they gain access to your bitcoin.
By default, the Passport will generate the 24-word seed phrase, encrypt it and save it to the microSD card. The seed phrase can then be decrypted with a password that the Passport will generate. This password is six English words. You can write the password down in a secure notebook, save it in a local password manager or save the password file in a secure cloud storage solution. If anyone gains access to your password, it does not put your funds directly at risk because they would also need physical access to the microSD card with the encrypted backup file. Likewise, if anyone gains access to the microSD card then they would need the six-word password to decrypt the seed phrase.
The Passport comes with two microSD cards and the encrypted seed phrase can be saved to both of them for redundancy.
To get started, insert the microSD card into the Passport, power it on and log in.
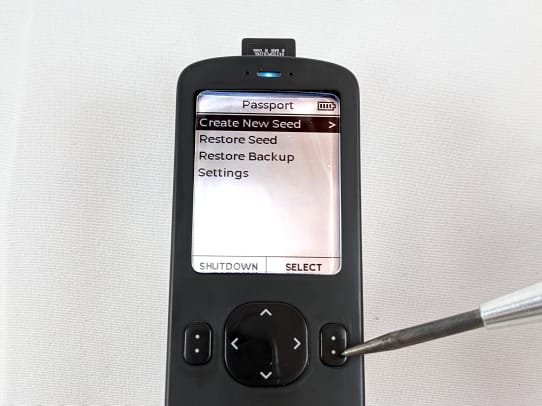
From the main menu select “Create New Seed” then scroll to the bottom of the displayed message explaining the two backups and select “continue.”
Next, the Passport will display a message explaining the six-word password you are about to be given. Scroll to the bottom of that message and then select “continue.”
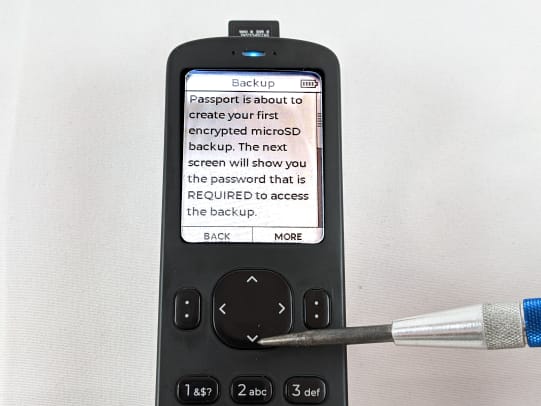
The Passport will now display your six-word password. Keep these words in order, one through six. Ensure that you save this in a way that it is accessible to you in the future and secure in the meantime. If you ever need to restore your Passport from backup, both the encrypted file from the microSD card and the six-word password will be required.

Once you have saved your password, the Passport will test you on it. Simply select the corresponding answer for each of the six words. After passing the test, the Passport will encrypt and save your seed phrase to the microSD card. Then the Passport will let you know the file location and then ask you if you want to make a secondary backup. If you want to make a secondary backup, simply remove the microSD card and replace it with the other microSD card then select “YES.”
There are other options for saving the seed phrase too. Many people like to physically write the 24 words in a notebook that they can keep secure. The advantage to this method is that physical access is required and there is absolutely no risk of remote access from a compromised device, like what may be introduced when using a digital medium. Some disadvantages to writing the seed phrase down on paper is that it cannot withstand extreme environments like fire or flooding.
Because of this environmental risk, many people choose to save their backup information in a steel media such as washers or plates. For an example, check out this guide on the subject.
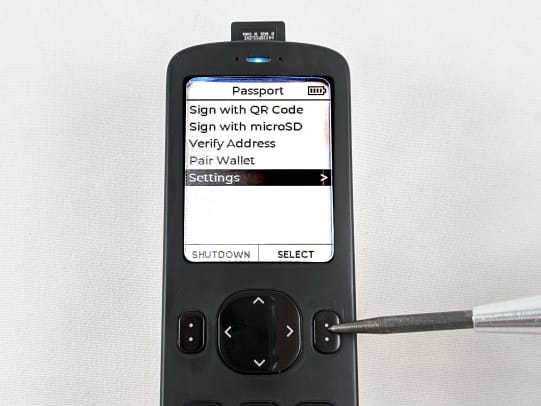
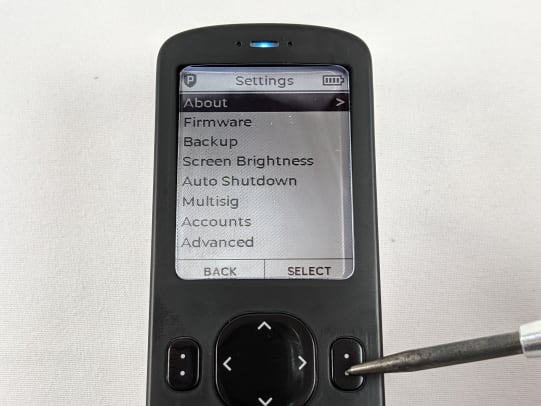
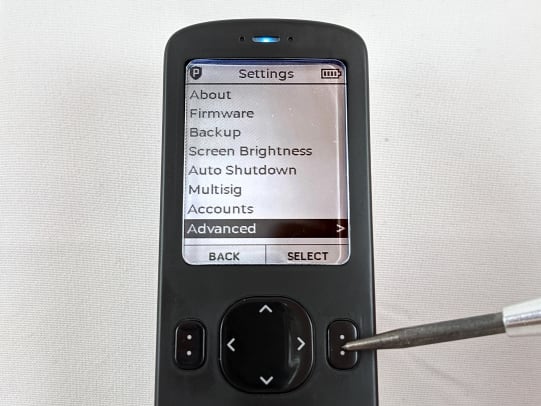
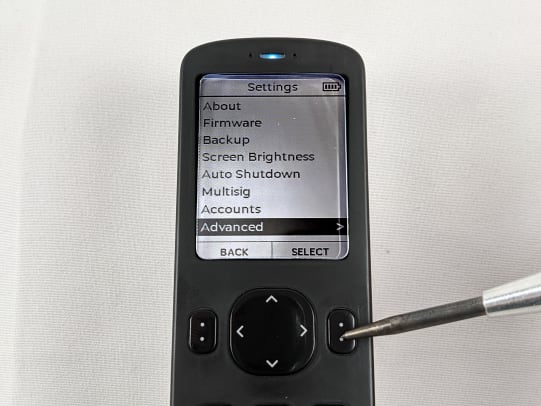
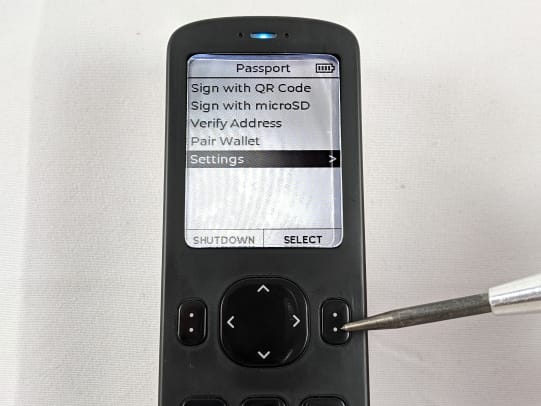
If you are interested in saving your seed phrase in some alternate form, it can be retrieved from the Passport. Navigate to the main menu and you will notice that the menu options have changed since the seed phrase has been created. Scroll down to “Settings,” then “Advanced,” then “View Seed Words.”
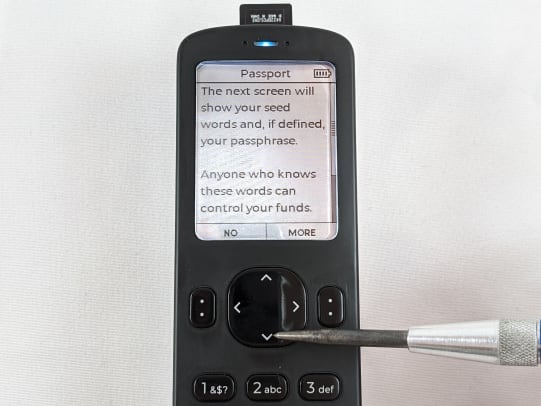
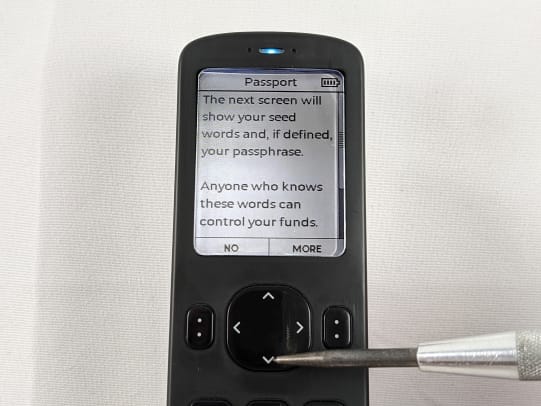
Then a message will be displayed explaining the risk of exposing these seed words to anyone. Scroll to the bottom of the message and select “YES” to display this sensitive information.
Here you can see your 24 words. Make sure you keep them in order when notating them. Double check you work. Do not share these words with anyone. Keep them secure however you choose to back them up. Anyone who gains access to these words can gain access to your bitcoin.

Testing your backups in any form is a good idea and will be covered after the Passphrase section. This will ensure your backups work as they should prior to depositing any funds.
Creating A Passphrase
A passphrase adds an extra layer of security to your Bitcoin wallet. The passphrase is an additional piece of information that is required in order to access your private key and sign transactions. The passphrase can be thought of as a “25th word” appended to the end of your 24-word seed phrase. Without the passphrase, the bitcoin will not be accessible.
There are some important considerations to make with passphrases:
- With the added security comes added complication. Keep in mind that it may not be you attempting to recover your bitcoin, it may be your loved ones who may not understand how Bitcoin wallets work.
- The Passport (or any BIP39 wallet) has no way of knowing whether or not you entered the correct passphrase. Any passphrase entered will cause the wallet to display a fully-functioning and valid bitcoin wallet. But only when you enter your passphrase correctly will the right wallet be opened. A “fingerprint” is used to uniquely identify the wallet so you know it is the right one.
- You will now need to secure an extra piece of information for a complete backup. This can be a disadvantage if you want to minimize the information required to access your bitcoin or this could be advantageous if you leverage it as a duress feature.
If you want to add a passphrase to your Passport, this section will show you how to do it. Make sure you write this information down in a notebook and secure it. The passphrase is not stored in your Passport encrypted backup file.
After you add a passphrase, in order to have a complete backup, you will need:
- The microSD card with the encrypted backup file (or the 24 words in writing)
- The six-word password to decrypt the backup file
- The passphrase and fingerprint
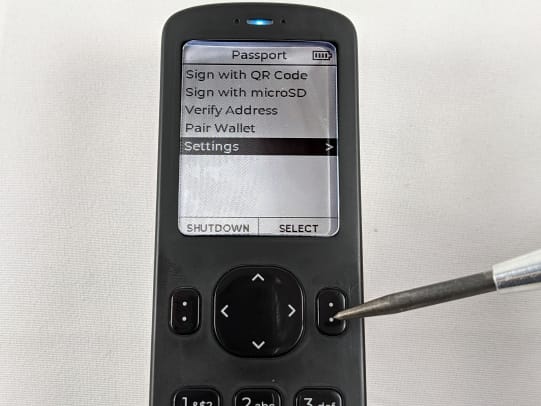
Log in to the Passport and then from the main menu select “Settings,” then “Advanced,” then “Passphrase,” then “Set Passphrase.”
This brings you to the screen where you can enter your passphrase. Passphrases are not limited to words like the seed phrase. Passphrases can contain any combination of special characters, lower case letters, upper case letters or numbers.
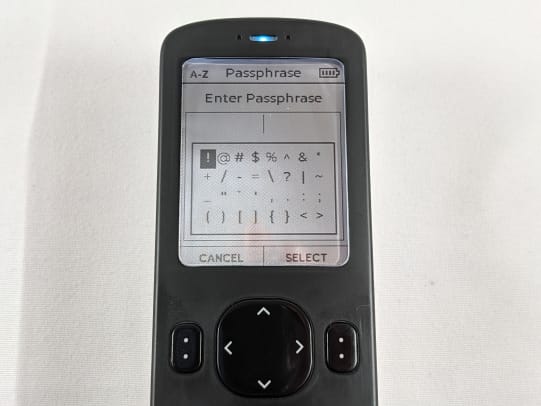
You can make your passphrase an easy-to-remember phrase or even a random, high-entropy string of characters.
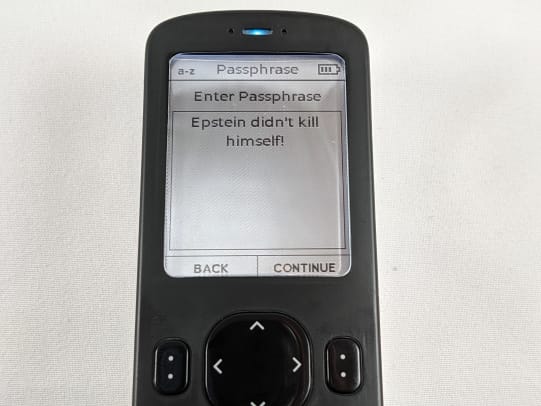
Once you decide what you want your passphrase to be, make sure you write it down exactly as you have it entered in the Passport. Remember, any deviation from this passphrase going forward will result in a completely different wallet being generated and you will lose your bitcoin if you do not save this information correctly and test it prior to making deposits. The Passport has no way of knowing if you entered the correct passphrase or not and there is nothing that can be done to help you recover a lost or forgotten passphrase.
The Passport will display the passphrase you are about to apply, if everything looks correct, click on “YES” to apply the passphrase.

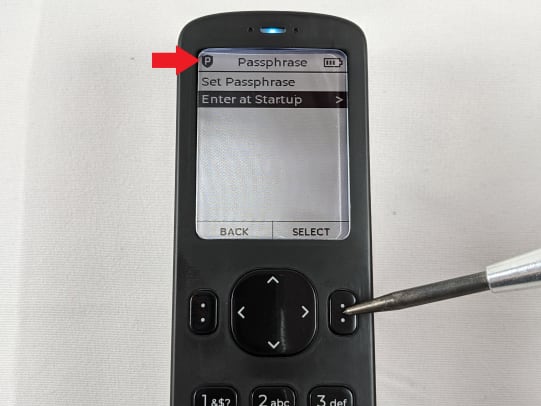
Once a passphrase is applied, you will notice the “P” shield in the upper left-hand corner signifying that a passphrase has been applied and that you are operating in a different wallet than the one you initially logged into. Also, if you want to be prompted for your passphrase upon logging into your Passport in the future, then you can enable this setting by navigating to and selecting “Enter at Startup,” then “Enabled.”
Next, you want to ensure that you write down the fingerprint as well along with your passphrase. The fingerprint is a unique string of characters that helps you identify that you have entered your passphrase correctly and that you are operating in the correct wallet when using the Passport in the future.
You can find your wallet’s fingerprint by navigating back to the “Settings” menu and then “About.” Note the “Master Fingerprint.”
Now that you have a seed phrase and passphrase created and your backup information secured, it is important to verify that your backup information is sufficient for recreating this exact wallet.
Testing Backups
This section will cover how to test your backups and ensure that you have all of the information necessary to recover your wallet in the event that you no longer have access to your Passport. Verifying the viability of your backup is an important step to take prior to depositing any bitcoin to your wallet. This may seem counterintuitive after taking all that time to set up your new Passport, but in this section you will see how to delete your private keys from your Passport. Then you will use your backup information to recreate your wallet.
This exercise not only ensures that your backup works but it also helps you understand the steps necessary to recover your wallet. You don’t want to wait until you absolutely need to recover your funds to learn how this works. Doing some practice and understanding the steps now, before making bitcoin deposits, will help you remain calm and know all the steps when it really counts.
This section demonstrates restoring from both the microSD card and the written 24-word seed phrase, starting with the microSD card method.
From MicroSD Card
First, ensure you have your encrypted file password written down. This is the six-word password that your Passport generated for you when you set up the device. Log in to the Passport and enter your passphrase, if you enabled the setting to prompt you for it at login. Then navigate to “Settings,” then “Backup,” then “View Password.” This will display your six words and you can confirm you have this information notated correctly.
Second, navigate back to “Settings,” then go to “Advanced” and “Erase Passport.” Then select “YES” to confirm that you wish to erase your Passport.
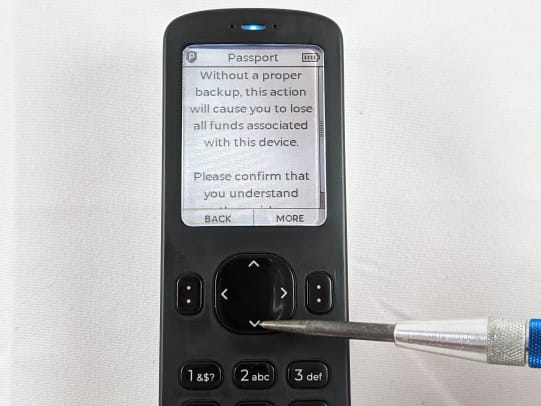
Then, read the message that explains that by confirming, you understand all funds will be lost without a proper backup. Scroll to the bottom of that message and then press “confirm” to acknowledge you understand the risks. This will initiate the Passport to erase your seed phrase.
Once the Passport reboots itself, insert your microSD card with the encrypted backup file. Log back in and then, from the main menu, select “Restore Backup,” then press “CONTINUE” to select the encrypted backup file from the microSD card. You probably only have one file to choose from, so select that file.

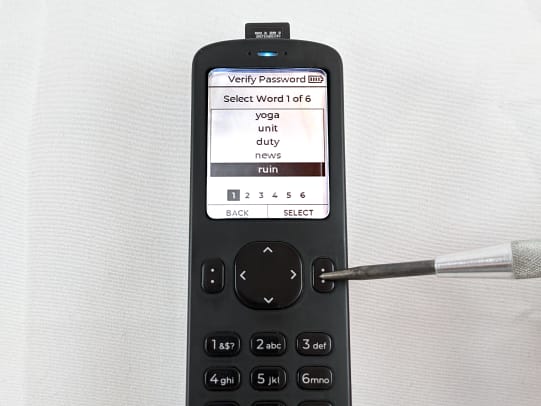
Next, you will be asked for your encrypted file password. Using the alphanumeric keypad, press the keys that spell the word you want. For example, to enter the word “ruin,” press “7,” “8,” “4” for “r,” “u,” “i,” respectively, and then select “ruin” from the short list of possible words.

Repeat that process for all six words in order, making up your password. Then, The Passport will alert you that the restoration was successful and that the device will now reboot. You can remove the microSD card at this time.

Next, you want to apply your passphrase and ensure that you get the same fingerprint returned that you have notated. Navigate to “Advanced,” then “Passphrase,” then “Set Passphrase,” then enter and apply your passphrase.
With the passphrase applied, you can then navigate to “Settings,” then “About” and view the master fingerprint there. This should match your records, if it does not match your records then you either entered the passphrase incorrectly or you have the wrong passphrase written down.
Now you know that your encrypted backup file on your microSD card works to restore your wallet and that your passphrase works too.
From Written Seed Words
This part demonstrates how to ensure the written seed phrase and passphrase can be used to restore your wallet. If you are only using the encrypted backup file on the microSD card then this step is not necessary for you. This is meant for people who want to write down their seed phrase or stamp it into metal.
First, ensure you have written down your seed phrase words correctly and in the right order. To verify this, log in to your Passport, then from the main menu select “Settings,” then “Advanced,” then “View Seed Words.”
You will be presented with a message explaining that anyone with access to these words has access to your bitcoin. Press the down arrow to scroll to the bottom of the message then press “YES.”
Then you can scroll through the list of words on your Passport and compare it to the list of words you have written down. Checking to be sure that the words are written down correctly and that they are in the right order.

Once you have verified that your seed words are notated correctly, ensure that the passphrase you have notated works as well. You want to compare the fingerprint you have written down to the one displayed on your Passport after applying the passphrase.
Navigate to “Settings,” then “Advanced,” then “Passphrase,” then “Set Passphrase.”
Enter your passphrase, then the Passport will display the passphrase you are about to apply, if everything looks correct, press “YES” to apply the passphrase.
Then view your wallet’s fingerprint by navigating back to the “Settings” menu and then “About.” Note the “Master Fingerprint.”
If everything looks good then you have verified that you have your seed words written down correctly and that your passphrase is correct and reproduces the same fingerprint. Now you can erase your Passport and restore from backup. Navigate back to “Setting,” then go to “Advanced” and “Erase Passport.” Then select “YES” to confirm that you wish to erase your Passport.
Then read the message that explains that by confirming, you understand all funds will be lost without a proper backup. Scroll to the bottom of that message and then press “confirm” to acknowledge you understand the risks. This will initiate the Passport to erase your seed phrase.
Once the Passport reboots itself, log back in, then from the main menu select “Restore Seed,” then “24-Word Seed,” then scroll to the bottom of the message explaining how the predictive text works and press “CONTINUE.”
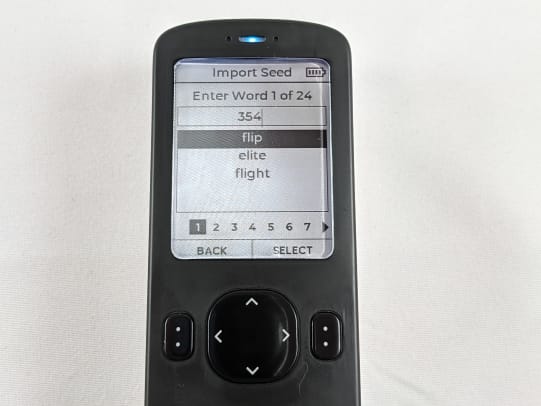
After you enter the 24th word, the Passport should automatically import the seed phrase and bring you back to the main menu. Now you want to apply your passphrase and then double check the resulting fingerprint to ensure that you were able to restore your wallet precisely. Follow the steps above for entering your passphrase and then checking the fingerprint.
Now that you have verified that either your encrypted backup file or your written seed words or both are valid and work accordingly, you can start making deposits to your Passport knowing that in a worst-case scenario, you indeed have the necessary backup information to recover your wallet.
Connecting Passport With Sparrow Wallet
In this section, you will see how to import information to Sparrow Wallet that allows you to monitor your Passport bitcoin balance, generate receive addresses and create transactions all while keeping the Passport air gapped. Sparrow Wallet is a desktop Bitcoin wallet designed to be connected with your own node. This is a user-friendly wallet with an intuitive interface and many capabilities and advanced features. To learn more about Sparrow Wallet and for installation instructions, visit the Sparrow Wallet website.
This section demonstrates how to connect Passport with Sparrow Wallet using your own Bitcoin Core node. If you don’t have your own Bitcoin node, you can use reputable public Electrum servers. However, there are privacy tradeoffs that come with using the convenience of a public Electrum server. Luckily, there are a number of resources available to help you spin up your own Bitcoin node, to learn more check out:
Once you have your Bitcoin Core node ready, there are a couple steps needed to configure it to work with Sparrow Wallet.
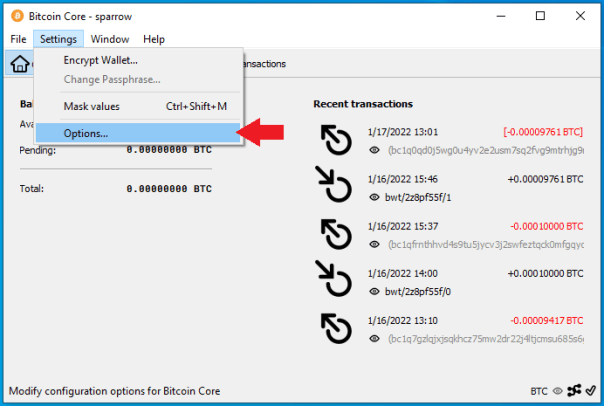
If you have Bitcoin Core running on the same computer as Sparrow Wallet, then all you need to do is open the “bitcoin.conf” configuration file and add “server=1” near the top and save it. Then relaunch Bitcoin Core. You may have a blank configuration file if this was a new Bitcoin Core install and that is fine.
If you are not sure where your “bitcoin.conf” file is located, you can always open it from within the Bitcoin Core application by navigating to “Settings,” then “Options” and then clicking on the “Open Configuration File” button in the pop-up window. Just be sure to close the application and restart it for those changes to take effect.
Alternatively, if you are running Bitcoin Core on a remote computer, you need to add a username and password and the Remote Procedure Calls (RPC), binding local IP addresses in the configuration file. To do this, navigate to the “bitcoin.conf” configuration file and open it in your preferred text editor. Then add the local IP address for your node and the local IP address for your desktop. For example:
rpcuser=pi
rpcpassword=Nakamoto21
rpcbind=127.0.0.1
rpcbind=192.168.0.11 #(your node)
rpcallowip=127.0.0.1
rpcallowip=192.168.0.12 #(desktop)

Save those changes and then you should be able to connect to your Bitcoin Core node from your computer on the same local network. Make sure you restart Bitcoin Core after saving those changes.
Now you are ready to configure Sparrow Wallet to talk to your Bitcoin Core node. Once you have Sparrow Wallet installed and launched, you will be presented with an empty user interface. Navigate to “File,” then “Preferences”:

Then click on the “Server” tab on the left-hand side. Click on the “Bitcoin Core” tab for the “Server Type.” If running Bitcoin Core on the same computer, use the “127.0.0.1” rpcbind IP address with “8332” as the port and the default authentication option. Or, if running Bitcoin Core on a different computer, use the same username and password that you entered in the “bitcoin.conf” file.
Either way, set the data folder directory to the same folder that the “bitcoin.conf” file is being written in (you should have been prompted to specify this folder when you launched Bitcoin Core for the first time prior to initial block download). This should be the same directory that Bitcoin Core writes the “.cookie” file that Sparrow Wallet needs to read.
Test the network connection from Sparrow Wallet. If it’s good, you should see the green check mark next to “Test Connection” and some information populated in the dialog box below that. If the connection is not good, try shutting down Sparrow Wallet, then ensure that Bitcoin Core is up and running and connected to some peers, then restart Sparrow Wallet and try again. Then you can close that window.

Unfortunately, Bitcoin Core stores your public keys and balances unencrypted on the computer it is running on. Although your bitcoin are not directly at risk of theft, if this computer is regularly connected to the internet, it is at risk to hackers — which has the potential to make you a target if your balance and geographic location are discovered. To learn more about Sparrow Wallet best practices, check out this Sparrow Wallet resource.
Now that Sparrow Wallet is connected with Bitcoin Core, the Passport can be connected via QR code if you have a webcam on your computer or via microSD card if you do not have a webcam.
Since the Passport is strictly an air-gapped hardware wallet, a Partially Signed Bitcoin Transaction (PSBT) is utilized to spend bitcoin from the Passport. The information necessary to generate such transactions is imported to Sparrow with the QR codes from the Passport. Basically, the public information from the Passport called an XPUB will be used to import the necessary information into Sparrow Wallet on your desktop. By doing this, Sparrow Wallet will be able to generate receive addresses and QR codes, monitor the Passport’s balance and initiate PSBTs. All without exposing the signing key on the Passport.
You can also use the microSD card to transfer information between the desktop and the Passport but the QR codes enable a faster user experience. This section will cover both, starting with the QR code method.
Importing Via QR Code
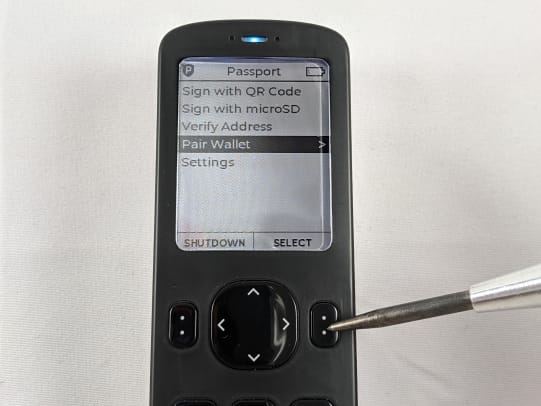
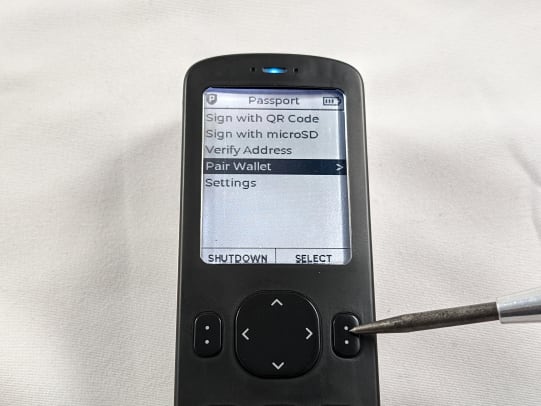
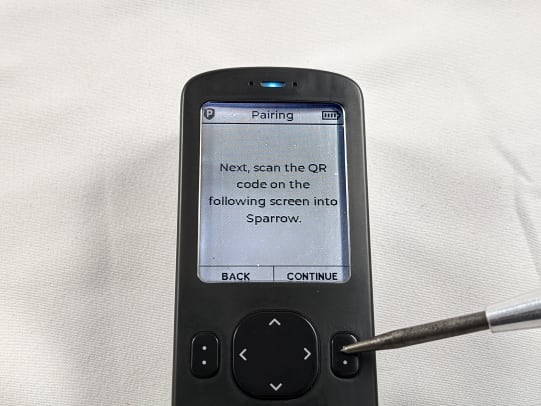
To import a single signature wallet via QR code, first log in to your Passport and enter your passphrase if you are using one. Then from the main menu navigate to “Pair Wallet,” then “Sparrow,” then “Single-sig,” then “QR Code.” Once you press “CONTINUE,” the Passport will start flashing a series of QR codes, so hold off on pressing that for a moment while you prepare Sparrow Wallet on your desktop.
In Sparrow Wallet on your desktop, navigate to “File,” then “Import Wallet.”

From the menu of wallets that pop up, scroll down to “Passport” and select “Scan…”

This should launch your webcam. Now you can pick your Passport back up and press “CONTINUE” to initiate the series of QR codes. If you want to resize the QR codes on the passport screen, you can press the “Resize” button to change the QR code resolution to three possible sizes.

Capturing the whole series of QR codes can take a moment, so try to keep the passport steady and the QR codes within the dotted boundary lines on the Sparrow Wallet screen. You can skip ahead in this guide to the “After Either QR Code Or File Import” section.
Importing Via File
To import a single signature wallet via file, first log in to your Passport and enter your passphrase if you are using one. Then, from the main menu, navigate to “Pair Wallet,” then “Sparrow,” then “Single-sig,” then “microSD.”
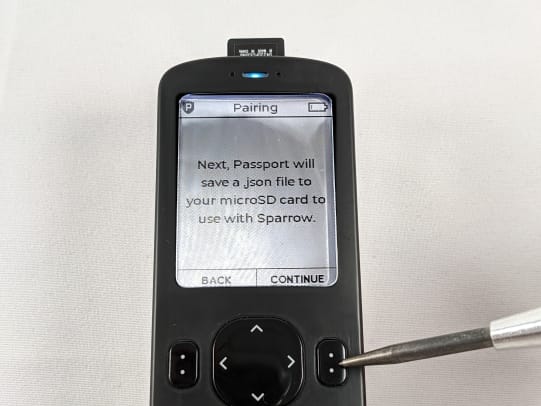
Make sure you insert the microSD card. The Passport explains that it is about to save a “.json” file to your microSD card with the XPUB information. This information will not put your funds at risk, however, they may put your privacy at risk as this XPUB information can be used to recreate your balance and transaction history. The Passport will let you know what the filename is going to be.
Next, the Passport will ask you to verify that import was successful by scanning an address generated from Sparrow Wallet and then scanning that address with the Passport camera to ensure it is an address that the Passport created. Set the Passport aside for now and go through the next section to get Sparrow Wallet ready to do this.

Remove the microSD card from the Passport and insert it into a microSD-to-USB adaptor and insert that to your desktop computer running Sparrow Wallet. Or, if your computer has a microSD card port, then you can just use that without the USB adaptor.

In Sparrow Wallet on your desktop, navigate to “File,” then “Import Wallet.”
From the menu of wallets that pop up, scroll down to “Passport” and select “Import File…”

This should launch your file explorer where you can navigate to the file location of the exported “.json” file on the microSD card and select “Open.”

After Either QR Code Or File Import
Once the necessary information has been gathered by Sparrow Wallet, either by QR code import or by “.json” file import, you should be taken back to the previous menu screen in Sparrow Wallet. This time though, you should notice that you can choose the “Script Type” from a dropdown menu, this is where you can choose whether you want to use legacy Bitcoin addresses that start with “1,” or nested SegWit addresses that start with “3,” or native SegWit addresses that start with “bc1q,” or Taproot addresses that start with “bc1p.” Although Sparrow Wallet is ready to handle Taproot addresses, this is anticipated to be implemented in the Passport in the first quarter of 2022. In this demo, bative SegWit, “bc1q” addresses are used.

Next, Sparrow Wallet will ask you to name your new wallet. This can be whatever you choose. In this example, “Passport Demo” is used. Then click on “Create Wallet.”

Then Sparrow Wallet will ask you if you want to use a password on this wallet. This password is what encrypts your wallet data file on your desktop and it is optional. If anyone gains access to your desktop, they could potentially open your wallet data file if it is not password protected. In this case, even if someone does open your wallet data file, they would not be able to spend your bitcoin because a signature from the Passport would be required to do that.

After applying the changes, you can now navigate through your watch-only wallet in Sparrow Wallet.

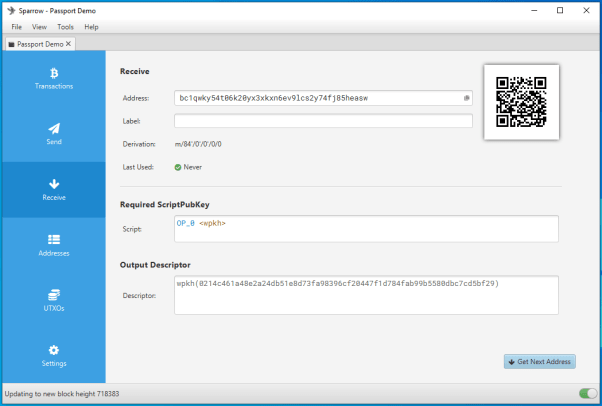
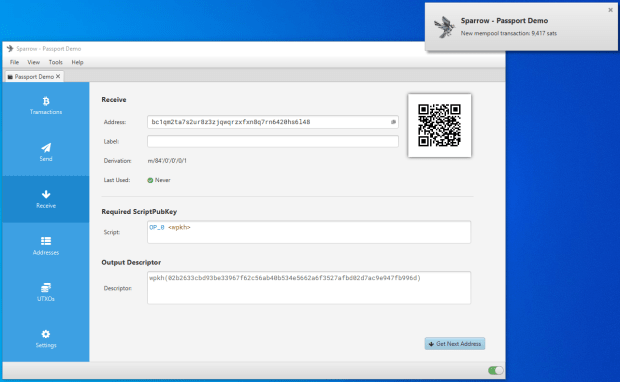
On the left-hand side of the Sparrow Wallet interface there are six tabs. The “Transactions” tab is where you can see information related to the transactions in this watch-only wallet. The “Send” tab is where you can create the PSBTs to then sign with Passport via QR code or microSD card. The “Receive” tab is where you can generate receive address for your Passport without having to retrieve the Passport and log into it. The “Addresses” tab shows several deposit and change addresses as well as any balances. The “UTXOs” tab shows any unspent transaction outputs and a small graph charting the history. Finally, the “Settings” tab is where you can see detailed information about the watch-only wallet such as the master fingerprint, derivation path and XPUB.
If you imported your Passport wallet from file, you still need to scan an address to verify with your Passport. Navigate to the “Receive” tab in Sparrow Wallet, this will bring up a Bitcoin receive address along with the QR code.
Now you can scan this Sparrow Wallet QR code with your Passport to verify the wallet import was completed successfully. Your Passport should still be waiting for you to verify that the import was successful. Scan this QR code with your Passport and you should see a prompt on the Passport saying “Pairing Complete.”
Back in Sparrow Wallet you can click on the “Receive” tab on the left-hand side menu any time you want to generate a new receive address. You can scan this QR code with your mobile Bitcoin wallet, for example, and deposit some bitcoin to your Passport. You should see the transaction show up in Sparrow Wallet after a moment along with a pop-up notification. Also, in Bitcoin Core, the transactions should show up there as well. The transaction will remain in a pending status until it receives some blockchain confirmations. In the meantime, you can click on the “Transactions” tab and review further details about your transaction. You can also copy/paste your transaction ID (TXID) in mempool.space to watch for your first confirmation, or use whatever your preferred block explorer is. Tor Browser is a privacy-focused browser.
Now you can power off and secure your Passport in a safe place until you want to sign a transaction and spend from it, several addresses will be cataloged in Sparrow Wallet so you can continue depositing to your Passport via Sparrow Wallet without having to reconnect it every time. Best practice is to confirm each receiving address on the Passport itself by navigating to “Verify Address” from the Passport main menu and scanning the displayed QR code in Sparrow Wallet with the Passport camera. Additionally, use each address only once.
When you are ready to sign a transaction to spend bitcoin, it is necessary to create a PSBT. You can deposit bitcoin with your Passport stored away but to spend bitcoin, the Passport needs to sign the transaction. Sparrow Wallet is used to build the transaction based on your available UTXOs and the information you enter when constructing the transaction. The PSBT details are passed between Sparrow Wallet and the Passport using the QR code exchange method or the microSD card.
Signing A PSBT Via QR Code
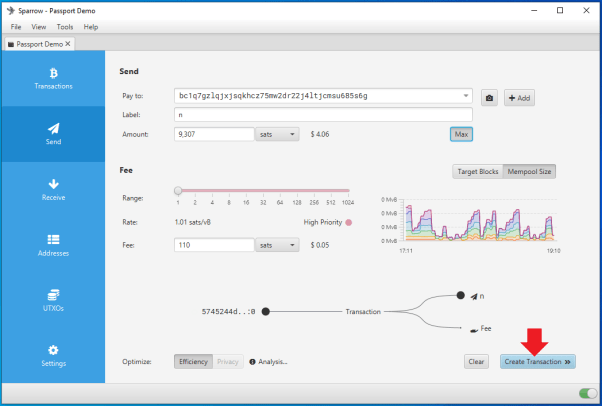
To create a PSBT, navigate to the “Send” tab on the left-hand side in Sparrow Wallet. There, you can paste the address you are sending to, add a label, enter an amount to send and choose a miners fee rate, etc. Once you have everything set, click on “Create Transaction.” On the next screen, double check the details then click on “Finalize Transaction for signing.” Then you will be asked what you want to do with the finalized PSBT. In this case, click on “Show QR” and Sparrow Wallet will launch an animated series of QR codes.
With your Passport, ensure you have the passphrase applied, then from the main menu select “Scan with QR Code.” Then point the camera on the Passport to the flashing series of QR codes in the Sparrow Wallet interface.

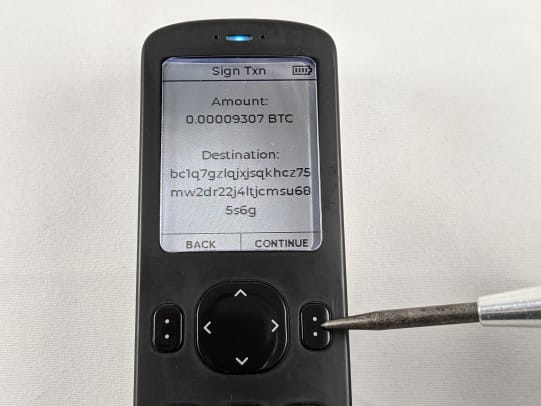
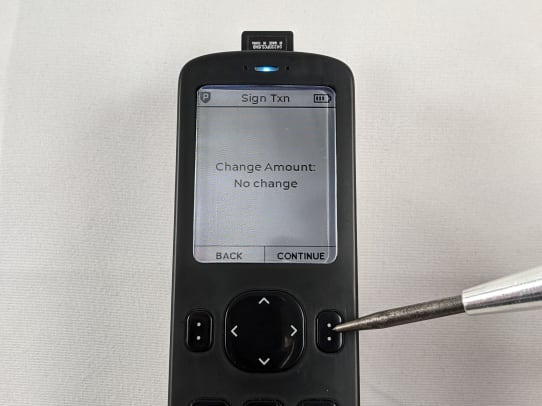
On the Passport screen you will be shown the amount of bitcoin being spent and the address it is being spent to, press “CONTINUE” if the details are correct. The Passport will then tell you what the change amount is, if any, and you can press “CONTINUE.” Lastly, the Passport will display the network fee, if everything is correct then press “SIGN.”
Once the transaction is signed by the Passport, a QR code will be displayed on the Passport screen. Back on your desktop, in Sparrow Wallet, select the “Scan QR” button with the camera icon.

This will launch your desktop webcam and you can hold the Passport in front of your webcam so that Sparrow Wallet can read the details of the signed transaction.

Once Sparrow Wallet picks up the details of the signed transaction, then you can broadcast the transaction to the Bitcoin network by pressing the “Broadcast Transaction” button.

At the time of broadcast you should see the transaction in Bitcoin Core as well as receive a notification in Sparrow Wallet. Again, you can copy the transaction ID and paste in your preferred block explorer to watch for confirmations.

Signing A PSBT Via microSD
To create a PSBT, navigate to the “Send” tab on the left-hand side in Sparrow Wallet. There, you can paste the address you are sending to, add a label, enter an amount to send, and choose a miners fee rate, etc. Once you have everything set, click on “Create Transaction.” On the next screen, double check the details then click on “Finalize Transaction for signing.” Then you will be asked what you want to do with the finalized PSBT. In this case, click on “Save Transaction” and Sparrow Wallet will launch your file explorer. Navigate to your microSD card and save the finalized transaction there.

Take the microSD card and insert it into the Passport. Power on the Passport and log in to it and apply the passphrase if necessary. Navigate to “Sign with microSD” then the Passport will display the amount to be spent and the destination address. Press “CONTINUE.”

The passport will display the change amount, if any, press “CONTINUE.” Next, the network fee will be displayed, if everything looks correct, press “SIGN.” Then the Passport will save the signed “.psbt” to the microSD card. You can remove the microSD card and press “CONTINUE” then shut down your Passport.
Insert the microSD card into your computer or use the USB adaptor and insert that into the computer if necessary. Then back in Sparrow Wallet, click on “Load Transaction” from the same screen you originally saved the “.psbt” file. Navigate to the microSD card and select the signed “.psbt” file.
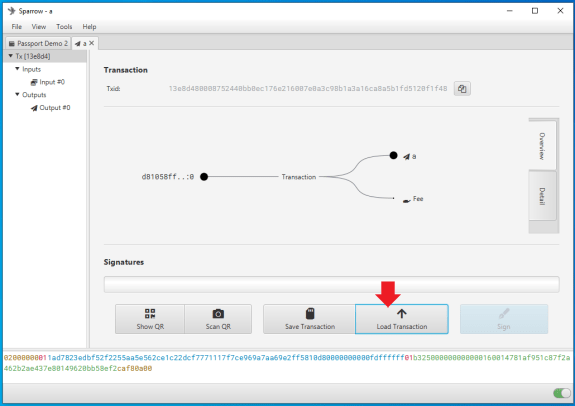
Once the transaction is loaded, click on the “Broadcast Transaction” button in Sparrow Wallet to send the transaction to the Bitcoin network.

At the time of broadcast you should see the transaction in Bitcoin Core as well as receive a notification in Sparrow Wallet. Again, you can copy the transaction ID and paste in your preferred block explorer to watch for confirmations.

The main point here is that your Passport is the required signing device while your Sparrow Wallet is your interface, transaction builder and broadcaster. In this configuration, Sparrow Wallet can do many things like catalog addresses and build transactions but without the signature from your Passport, Sparrow Wallet cannot authorize spending of any bitcoin secured by the Passport.
You should now be able to connect your Passport with Sparrow Wallet and sign transactions via QR code or microSD card in a single signature manner. In the next section, multisig configurations will be explained.
MultiSig
Multisig is shorthand for “multiple signatures,” and this popular configuration is how you can secure your bitcoin in such a way that signatures from multiple wallets are required in order for the bitcoin to be spent. In the case of hardware wallets, this means you need multiple devices to sign the transaction.
One approach to multisig is to use hardware wallets from different manufacturers in order to mitigate unforeseen vulnerabilities or attack vectors that may be present in one manufacturer but not another. Depending on how the multisig quorum is configured, two-of-three signatures may be required to spend the bitcoin, or this number can be extended to even more robust security models like seven of nine.
In this demonstration, a two-of-three multisig configuration will be presented using one software wallet in Sparrow Wallet, one Coldcard hardware wallet and one Passport hardware wallet. This means that one-of-three signatures will be from a hot wallet. If you want to ensure your multisig setup has all air-gapped keys, then use a third hardware wallet instead. This guide will at least give you the basic understanding you need to customize your configuration to fit your needs. To learn more about getting started with Coldcard, check out this guide.
Sparrow Wallet
Starting with Sparrow Wallet, navigate to “File,” then “New Wallet.”

Then Sparrow Wallet will ask you to name your new wallet, and this can be anything you want. In this example “MultiSig Demo” was used.

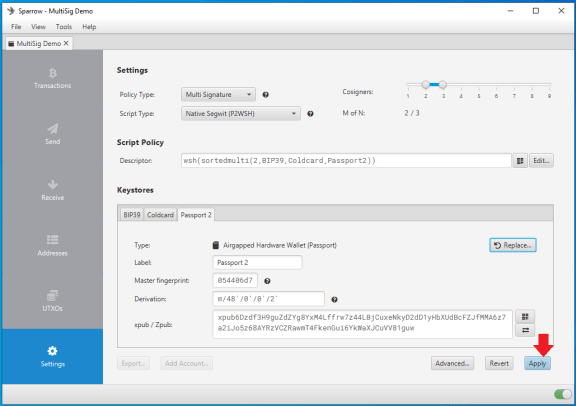
On the next screen select “Multi Signature” from the policy type dropdown menu.
Choose the script type you want; P2SH for legacy addresses that start with “1,” P2SH-P2WSH for nested SegWit addresses that start with “3,” or P2WSH for native-SegWit addresses that start with “bc1q.” In this example, P2WSH native SegWit addresses will be used.
Choose how many cosigners are required, in this example two of three will be used which means that any two signatures from the Passport, the Coldcard or Sparrow Wallet combined will suffice for spending the bitcoin locked up in this quorum.
Then under the Keystores section, you will see three tabs (more if your quorum is larger). For the first keystore, “Keystore 1,” select “New or Imported Software Wallet.” This will create a brand new wallet in Sparrow Wallet to be set up as the first cosigning wallet.

A pop-up window will appear, click on the “Enter 24 words” button next to the “Mnemonic Words (BIP39)” option.

On the next screen, click on “Generate New” to have Sparrow Wallet randomly generate 24 seed words.

Sparrow Wallet will generate 24 words making your new seed phrase. Do not share these words with anyone, they will have access to one-of-three signing keys. Do not take a screenshot of these words, do not store them in a digital format, do not take a picture of them with your phone, you will compromise the security of your multisig setup. Write these words down on paper at the very least and consider stamping them into metal for a backup that can withstand extreme environmental hazards.
Also, you have the option here of adding a passphrase if you want. As explained earlier in this guide, a passphrase can be thought of as a “25th word” that only you know.
Once you have written down your words and optional passphrase and double checked your work, click on the “Confirm Backup…” button to verify you have written this information down correctly. Sparrow Wallet will ask you if you have written the words down, click on the “Re-enter Words…” button to continue the test.

Once you have re-entered all 24 words in order, click on the “Create KeyStore” button.

On the next screen, click on the “Import Keystore” button.

You will be taken back to the settings page for your multisig configuration. The first keystore is finished and you will notice that it has been populated with the details from your newly set up wallet.

Coldcard
Click on the “Keystore 2” tab, then select “Airgapped Hardware Wallet.”

In the next window that pops up, press the “Import File…” button in the “Coldcard Multisig” row. This will open the file explorer where you can navigate to the file written by your Coldcard.

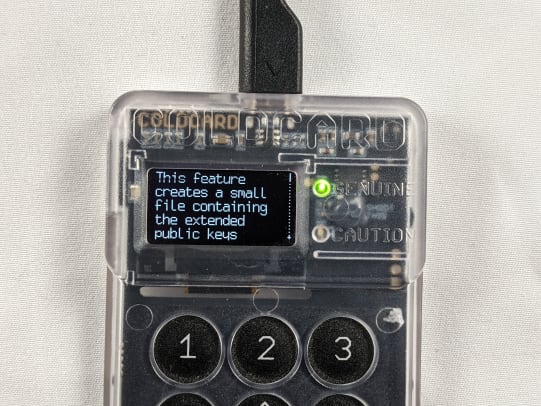
If you have not done so already, you need to export the “.json” file with the XPUB information from the Coldcard. These next steps will only show a very high-level explainer on how to export this information but for a full detailed guide read this article.
After setting up your Coldcard for the first time and securing your PIN and anti-phishing words, as well as upgrading the firmware; one of the first things you will do is generate a new wallet by navigating to “New Wallet” from the main menu, if you have not set up a wallet on this Coldcard already.

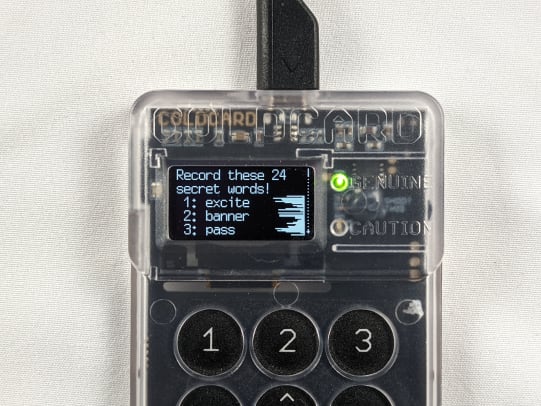
Then the Coldcard will randomly generate and display 24 seed words, again do not share these words with anyone, they will have access to one-of-three signing keys. Do not take a screenshot of these words, do not store them in a digital format, do not take a picture of them with your phone, you will compromise the security of your multisig setup. Write these words down on paper at the very least and consider stamping them into metal for a backup that can withstand extreme environmental hazards.
The Coldcard will then test you on all the words.
At this point, if you want to enter a passphrase on the Coldcard, you can do so at this time. Refer to this article for details on the passphrase. To summarize, the Coldcard has no way of knowing if your passphrase is correct, so ensure that you double check your work by testing your backup information so you know you have everything you need to restore your wallet.
Once you have decided whether you want a passphrase or not, then navigate to “Settings” from the main menu and then “Multisig Wallets” then “Export XPUB.” At this point, you can insert a microSD card into the Coldcard.
The Coldcard will then display a message explaining the contents of the “.json” file. After pressing “OK” on the Coldcard at the end of that message, the Coldcard will ask you for an account number, you can just leave it blank for the default “0.” Then the Coldard will let you know when the file is finished being written to the microSD card and what the name of the file is.
Remove the microSD card from the Coldcard and insert the microSD card into your computer or use an USB adaptor and then insert that into your desktop computer running Sparrow Wallet. Back in Sparrow Wallet, navigate to the microSD card and select the “coldcard-export.json” file.

Sparrow Wallet will use the “.json” file to populate the necessary information in “Keystore 2.” Now you can navigate to the “Keystore 3” tab.

Passport
From the “Keystore 3” tab, select “Airgapped Hardware Wallet.”

From the pop up window, press the “Scan…” button on the “Passport Multisig” row.

Then Sparrow will launch the webcam and wait for you to hold up the Passport with the animated QR codes. Log in to the Passport and apply the passphrase if necessary. Then from the main menu scroll down to “Pair Wallet,” then “Sparrow,” then “Multisig,” then “QR Code.”
The Passport will display a message saying to scan the following QR codes into Sparrow. Now hold the Passport up to your webcam and let Sparrow scan in the details from the animated QR codes.
Sparrow will use the QR code information to automatically populate the necessary information for “Keystore 3.” Then you can click on “Apply.” Then Sparrow will ask you if you would like to add a password, this is an optional password that encrypts the wallet data file on your computer to prevent anyone from gaining access to this information by gaining access to your computer.
Transacting
Now you can navigate through your new multisig wallet, for example, from the “Receive” tab you can display a deposit address that you can scan with your mobile Bitcoin wallet or copy/paste the address as necessary to deposit some bitcoin to your new multisig wallet.

Once you send some bitcoin, the transaction will appear in Bitcoin Core and Sparrow Wallet, you can copy/paste the TXID into your favorite block explorer and watch the mempool progress. Once your bitcoin is deposited in your multisig wallet, you will need to provide at least two-of-three signatures from the three wallets to spend this bitcoin.

Once you are ready to spend from your multisig wallet, set up the transaction the same way you do for a single signature transaction by navigating to the “Send” tab on the left-hand side of the Sparrow Wallet interface. There, you can input the Bitcoin address to spend to, add a label, enter the amount, set the miners fee and then click on “Create Transaction.”

Then, on the next screen click on “Finalize Transaction for Signing.”

At this point, you have a couple of options, this transaction needs two-of-three signatures in order to be valid. One of the signatures can be provided by Sparrow Wallet since it is one of the cosigners. To sign with Sparrow Wallet, simply click on the “Sign” button in the lower left-hand corner and then one signature will be added. However, it would be beneficial for the purposes of this guide to demonstrate both hardware wallets signing. Starting with the Coldcard, click on the “Save Transaction” button.

This will launch the file explorer, navigate to the microSD card and save the transaction there.

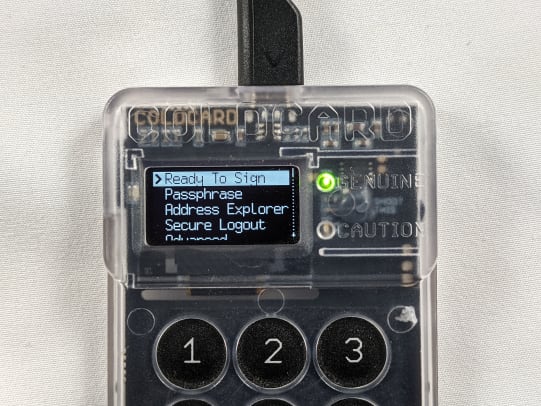
Take that microSD card and insert into the Coldcard, then power it on and log in and apply a passphrase, if necessary. From the main menu, select “Ready To Sign” then the Coldcard will read the multisig transaction from the microSD card and ask if you want to create a new multisig wallet, press “OK.” The Coldcard will then display the amount to be spent, the address being sent to, and the network fee. If everything looks good then press “OK.” Last, the Coldcard will let you know when the transaction has been signed and what the name of the new file is.
You can now power down the Coldcard and eject the microSD card. Insert the microSD card into your USB adaptor and insert that into the computer running Sparrow Wallet. Then, back in Sparrow Wallet, from the transaction screen click on “Load Transaction.” Then a file explorer will open, navigate to the microSD card and select the partially-signed transaction.
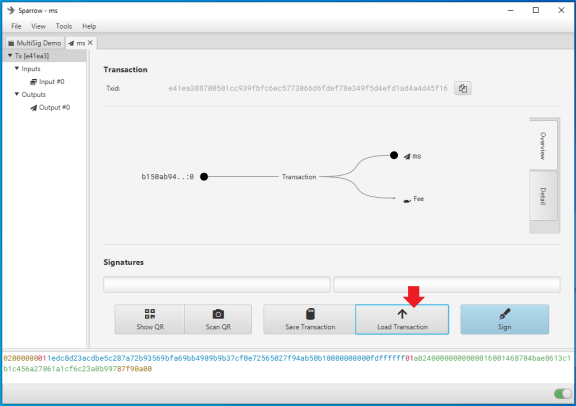
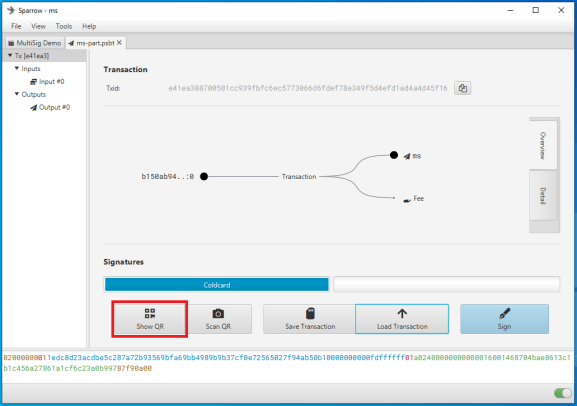
You’ll see one of the two required signatures populate in Sparrow Wallet. Now you can sign with the Passport by pressing the “Show QR” button in Sparrow Wallet. An animated series of QR codes will be displayed in a pop up window.
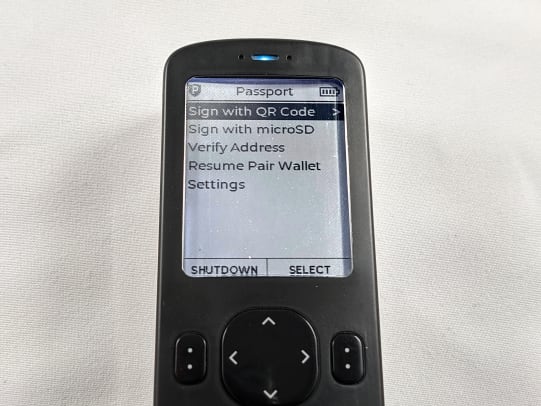
At this point, power on the Passport, log in and apply the passphrase if necessary. From the main menu, select “Sign with QR Code.” Then, the Passport will ask you if you want to create a new multisig wallet, scroll to the bottom of that message and select to continue. The amount to be spent and the destination address will be displayed, if there will be any change then that will also be displayed, and the network fee will be displayed. If all the details look correct, press “SIGN.”
Then the Passport will let you know it is going to start flashing a series of QR codes in the next step, press “CONTINUE” then go back to Sparrow Wallet and click on “Scan QR.” The webcam will launch and then you can hold the Passport up to the camera so that Sparrow Wallet can scan the animated QR codes.

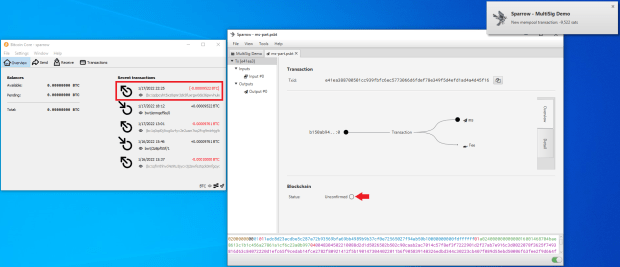
That makes two-of-three signatures and the transaction is now ready to be broadcast to the Bitcoin network. Simply click on the “Broadcast Transaction” button.

Once the transaction is broadcast, you will see it in Bitcoin Core and you will get the Sparrow Wallet notification. Then you can copy/paste the TXID into your favorite block explorer and wait for your first confirmation.
Now that you see how multisig works, it is important to backup the appropriate information and test those backups before depositing any bitcoin to your new multisig wallet. Be sure to have the seed words written down in order, then think about stamping them in metal. Have your passphrase written down and consider stamping that in metal. Have your XPUBs written down as well and consider stamping those in metal.
There are a number of creative solutions you can employ to conceal backup information in different geographic locations. For example, say you have a two-of-three multisig, each wallet has a 24-word seed phrase, we’ll call it “S” in this example. Each wallet also has a passphrase, we’ll call it “P.” And each wallet has an XPUB, we’ll call that “X.” You could in theory then store your backup information like:
| Location | Seed Phrase | Passphrase | XPUB |
|---|---|---|---|
|
L1 |
S1 |
P2 and P3 |
X3 |
|
L2 |
S2 |
P3 and P1 |
X1 |
|
L3 |
S3 |
P1 and P2 |
X2 |
That way if anyone else finds any of the backup packs, they will not have enough information to spend any bitcoin. But if you are able to recover any two of the three backup packs, then you will have enough information to restore your multisig wallet and sign a transaction.
Additional Features
This section covers a few additional features at a high level. This is meant more to be reference material than step-by-step instructions. This is not an exhaustive list, just some useful highlights.
Change The Screen Brightness
Purpose: Helps save on battery life, easier to view the screen in low light environments.
Process: Navigate to “Settings,” then “Screen Brightness,” then choose “25%,” “50%,” “75%” or “100%.”
Auto Shutdown
Purpose: Helps save on battery life, adds security if you step away from the device for too long.
Process: Navigate to “Settings,” then “Auto Shutdown,” then choose “1 minute,” “2 minutes,” “5 minutes,” “15 minutes,” “30 minutes,” “60 minutes” or “Never.”
Change PIN
Purpose: Allows users to modify the existing PIN number in case it was compromised for any other reason.
Process: Navigate to “Settings,” then “Advanced,” then “Change PIN,” then enter your current PIN, then add and confirm your new PIN. This action will generate two new anti-phishing words, so be sure to note that in your backup information.
Units
Purpose: Change the way bitcoin amounts are displayed on the device.
Process: Navigate to “Settings,” then “Advanced,” then “Units,” then choose “BTC” or “sats.” For example, 1.2575 BTC would be displayed as 125,750,000 sats.
Sign A Text File
Purpose: Prove ownership of an address.
Process: Navigate to “Settings,” then “Advanced,” then “Sign Text File,” then load your message in a “.txt” file and save it to the microSD card. Insert the microSD card, select the file and sign. The Passport will automatically select the address used to sign and save a new file appended with “-signed.txt.”
You can see the implications of being able to sign a message with an address in full force here.
Import Public Key
Purpose: This allows advanced users to import their own public key to the Passport so that when they compile their own firmware, the Passport will use their own key to verify it along with the Foundation developer keys.
Process: Navigate to “Settings,” then “Advanced,” then “Developer PubKey,” then “Install PubKey,” then insert a microSD card with your public key and import.
This is a guest post by Econoalchemist. Opinions expressed are entirely their own and do not necessarily reflect those of BTC Inc or Bitcoin Magazine.